Image#
Represents an image object through the Image class, inheriting all base functionality from the File class with extra functionality including resizing.
Usage#
Managing images through form fields#
Images can be uploaded like any other file, through FileField.
More advanced usage is possible through UploadField,
which provides thumbnails, a detail view of the image properties,
and management of relationships to other DataObject instances.
Allows upload of images through limiting file extensions with setAllowedExtensions().
Inserting images into the WYSIWYG editor#
See Topics: Rich Text Editing.
Manipulating images in Templates#
You can manipulate images directly from templates to create images that are resized and cropped to suit your needs. This doesn't affect the original image or clutter the CMS with any additional files, and any images you create in this way are cached for later use. In most cases the pixel aspect ratios of images are preserved (meaning images are not stretched).
Here are some examples, assuming the $Image object has dimensions of 200x100px:
// Scaling functions
$Image.ScaleWidth(150) // Returns a 150x75px image
$Image.ScaleMaxWidth(100) // Returns a 100x50px image (like ScaleWidth but prevents up-sampling)
$Image.ScaleHeight(150) // Returns a 300x150px image (up-sampled. Try to avoid doing this)
$Image.ScaleMaxHeight(150) // Returns a 200x100px image (like ScaleHeight but prevents up-sampling)
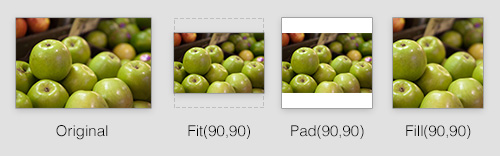
$Image.Fit(300,300) // Returns an image that fits within a 300x300px boundary, resulting in a 300x150px image (up-sampled)
$Image.FitMax(300,300) // Returns a 200x100px image (like Fit but prevents up-sampling)
// Cropping functions
$Image.Fill(150,150) // Returns a 150x150px image resized and cropped to fill specified dimensions (up-sampled)
$Image.FillMax(150,150) // Returns a 100x100px image (like Fill but prevents up-sampling)
$Image.CropWidth(150) // Returns a 150x100px image (trims excess pixels off the x axis from the center)
$Image.CropHeight(50) // Returns a 200x50px image (trims excess pixels off the y axis from the center)
// Padding functions (add space around an image)
$Image.Pad(100,100) // Returns a 100x100px padded image, with white bars added at the top and bottom
$Image.Pad(100, 100, CCCCCC) // Same as above but with a grey background
// Metadata
$Image.Width // Returns width of image
$Image.Height // Returns height of image
$Image.Orientation // Returns Orientation
$Image.Title // Returns the friendly file name
$Image.Name // Returns the actual file name
$Image.FileName // Returns the actual file name including directory path from web root
$Image.Link // Returns relative URL path to image
$Image.AbsoluteLink // Returns absolute URL path to image
<body style="background-image:url($Image.ScaleWidth(800).CropHeight(800).Link)">
The Pad method allows you to resize an image with existing ratio and will pad any surplus space. You can specify the color of the padding using a hex code such as FFFFFF or 000000.
You can also specify a level of transparency to apply to the padding color in a fourth param. This will only effect png images.
	$Image.Pad(80, 80, FFFFFF, 50) // white padding with 50% transparency
	$Image.Pad(80, 80, FFFFFF, 100) // white padding with 100% transparency
	$Image.Pad(80, 80, FFFFFF) // white padding with no transparency
The image manipulation functions can be used in your code with the same names, example: $image->Fill(150,150).
Some of the MetaData functions need to be prefixed with 'get', example getHeight(), getOrientation() etc.
Please refer to the Image API documentation for specific functions.
Creating custom image functions#
You can also create your own functions by extending the image class, for example
	Image:
	  extensions:
	    - MyImage
For usage on a website form, see FileField. If you want to upload images within the CMS, see UploadField.
Image Quality#
To adjust the quality of the generated images when they are resized add the following to your mysite/config/config.yml file:
	GDBackend:
	  default_quality: 90
	# or
	ImagickBackend:
	  default_quality: 90
By default SilverStripe image functions will not resample an image if no cropping or resizing is taking place. You can tell SilverStripe to always to always produce resampled output by adding this to your mysite/config/config.yml file:
	Image:
	  force_resample: true
to upload high quality (minimal compression) images as these will produce better results when resampled. Very high resolution images may cause GD to crash so a good size for website images is around 2000px on the longest edge.
Clearing Thumbnail Cache#
Images are (like all other Files) synchronized with the SilverStripe database. This syncing happens whenever you load the "Files & Images" interface, and whenever you upload or modify an Image through SilverStripe.
If you encounter problems with images not appearing, or have mysteriously disappeared, you can try manually flushing the image cache.
http://localhost/dev/tasks/RegenerateCachedImagesTask
This task was renamed to RegenerateCachedImagesTask (originally FlushGeneratedImagesTask) circa SilverStripe 3.2.
[/notice]