Contributing Code - Submitting Bugfixes and Enhancements#
SilverStripe will never be finished, and we need your help to keep making it better. If you're a developer a great way to get involved is to contribute patches to our modules and core codebase, fixing bugs or adding features.
The SilverStripe core modules (framework and cms), as well as some of the more popular modules are in
git version control. SilverStripe hosts its modules on github.com/silverstripe. After installing git and creating a free github.com account, you can "fork" a module,
which creates a copy that you can commit to (see github's guide to "forking").
For other modules, our add-ons site lists the repository locations, typically using the version control system like "git".
[hint] Note: By supplying code to the SilverStripe core team in patches, tickets and pull requests, you agree to assign copyright of that code to SilverStripe Limited, on the condition that SilverStripe Limited releases that code under the BSD license.
We ask for this so that the ownership in the license is clear and unambiguous, and so that community involvement doesn't stop us from being able to continue supporting these projects. By releasing this code under a permissive license, this copyright assignment won't prevent you from using the code in any way you see fit. [/hint]
Step-by-step: From forking to sending the pull request#
[notice] Note: Please adjust the commands below to the version of SilverStripe that you're targeting. [/notice]
-
Install the project through composer. The process is described in detail in "Installation through Composer".
textcomposer create-project --keep-vcs --dev silverstripe/installer ./my/website/folder 3.2.x-dev -
Edit the
composer.json. Remove any@stablemarkers from the core modules in there. Add your fork URLs, in this example a fork of thecmsmodule on thesminneegithub account (replace with your own fork URL). Run acomposer updateafterwards.
		"repositories": [
			{
				"type": "vcs",
				"url": "git@github.com:sminnee/silverstripe-cms.git"
			}
		],
		cd cms
		git remote add -f upstream git://github.com/silverstripe/silverstripe-cms.git
		# verify current branch 'base' then branch and switch
		git status
		git branch ###-description
		git checkout ###-description
		# [make sure all your changes are committed as necessary in branch]
		git fetch upstream
		git rebase upstream/3.2
		git fetch upstream
		git rebase -i upstream/3.2
git push origin ###-description
The core team is then responsible for reviewing patches and deciding if they will make it into core. If there are any problems they will follow up with you, so please ensure they have a way to contact you!
Picking the right version#
SilverStripe core and module releases (since the 3.1.8 release) follow the Semantic Versioning (SemVer) specification for releases. Using this specification declares to the entire development community the severity and intention of each release. It gives developers the ability to safely declare their dependencies and understand the scope involved in each upgrade.
Each release is labeled in the format $MAJOR.$MINOR.$PATCH. For example, 3.1.8 or 3.2.0.
$MAJORversion is incremented if any backwards incompatible changes are introduced to the public API.$MINORversion is incremented if new, backwards compatible functionality is introduced to the public API or
improvements are introduced within the private code.
an internal change that fixes incorrect behavior.
In future major releases of SilverStripe, we will endeavour to be more explicit about documenting the public API.
Contributing bug fixes
Bug fixes should be raised against the most recent MINOR release branch. For example, If your project is on 3.3.1 and 3.4.0 is released, please raise your bugfix against the 3.4 branch. Older MINOR release branches are primarily intended for critical bugfixes and security issues.
Contributing features
When contributing a backwards compatible change, raise it against the same MAJOR branch as your project. For example, if your project is on 3.3.1, raise it against the 3 branch. It will be included in the next MINOR release, e.g. 3.4.0. And then when it is released, you should upgrade your project to use it. As it is a MINOR change, it shouldn't break anything, and be a relatively painless upgrade.
Contributing backwards-incompatible public API changes, and removing or radically changing existing feautres
When contributing a backwards incompatible change, you must raise it against the master branch.
The Pull Request Process#
Once your pull request is issued, it's not the end of the road. A core committer will most likely have some questions for you and may ask you to make some changes depending on discussions you have. If you've been naughty and not adhered to the coding conventions, expect a few requests to make changes so your code is in-line.
If your change is particularly significant, it may be referred to the mailing list for further community discussion.
A core committer will also "label" your PR using the labels defined in GitHub, these are to correctly classify and help find your work at a later date.
GitHub Labels#
The current GitHub labels are grouped into 5 sections:
- Changes - These are designed to signal what kind of change they are and how they fit into the Semantic Versioning schema
- Impact - What impact does this bug/issue/fix have, does it break a feature completely, is it just a side effect or is it trivial and not a bit problem (but a bit annoying)
- Effort - How much effort is required to fix this issue?
- Type - What aspect of the system the PR/issue covers
- Feedback - Are we waiting on feedback, if so who from? Typically used for issues that are likely to take a while to have feedback given
| Label | Purpose |
|---|---|
| change/major | A change for the next major release (eg: 4.0) |
| change/minor | A change for the next minor release (eg: 3.x) |
| change/patch | A change for the next patch release (eg: 3.1.x) |
| impact/critical | Broken functionality for which no work around can be produced |
| impact/high | Broken functionality but can be mitigated by other non-core code changes |
| impact/medium | Unexpected behaviour but does not break functionality |
| impact/low | A nuisance but doesn't break any functionality (typos, etc) |
| effort/easy | Someone with limited SilverStripe experience could resolve |
| effort/medium | Someone with a good understanding of SilverStripe could resolve |
| effort/hard | Only an expert with SilverStripe could resolve |
| type/docs | A docs change |
| type/frontend | A change to front-end (CSS, HTML, etc) |
| feedback-required/core-team | Core team members need to give an in-depth consideration |
| feedback-required/author | This issue is awaiting feedback from the original author of the PR |
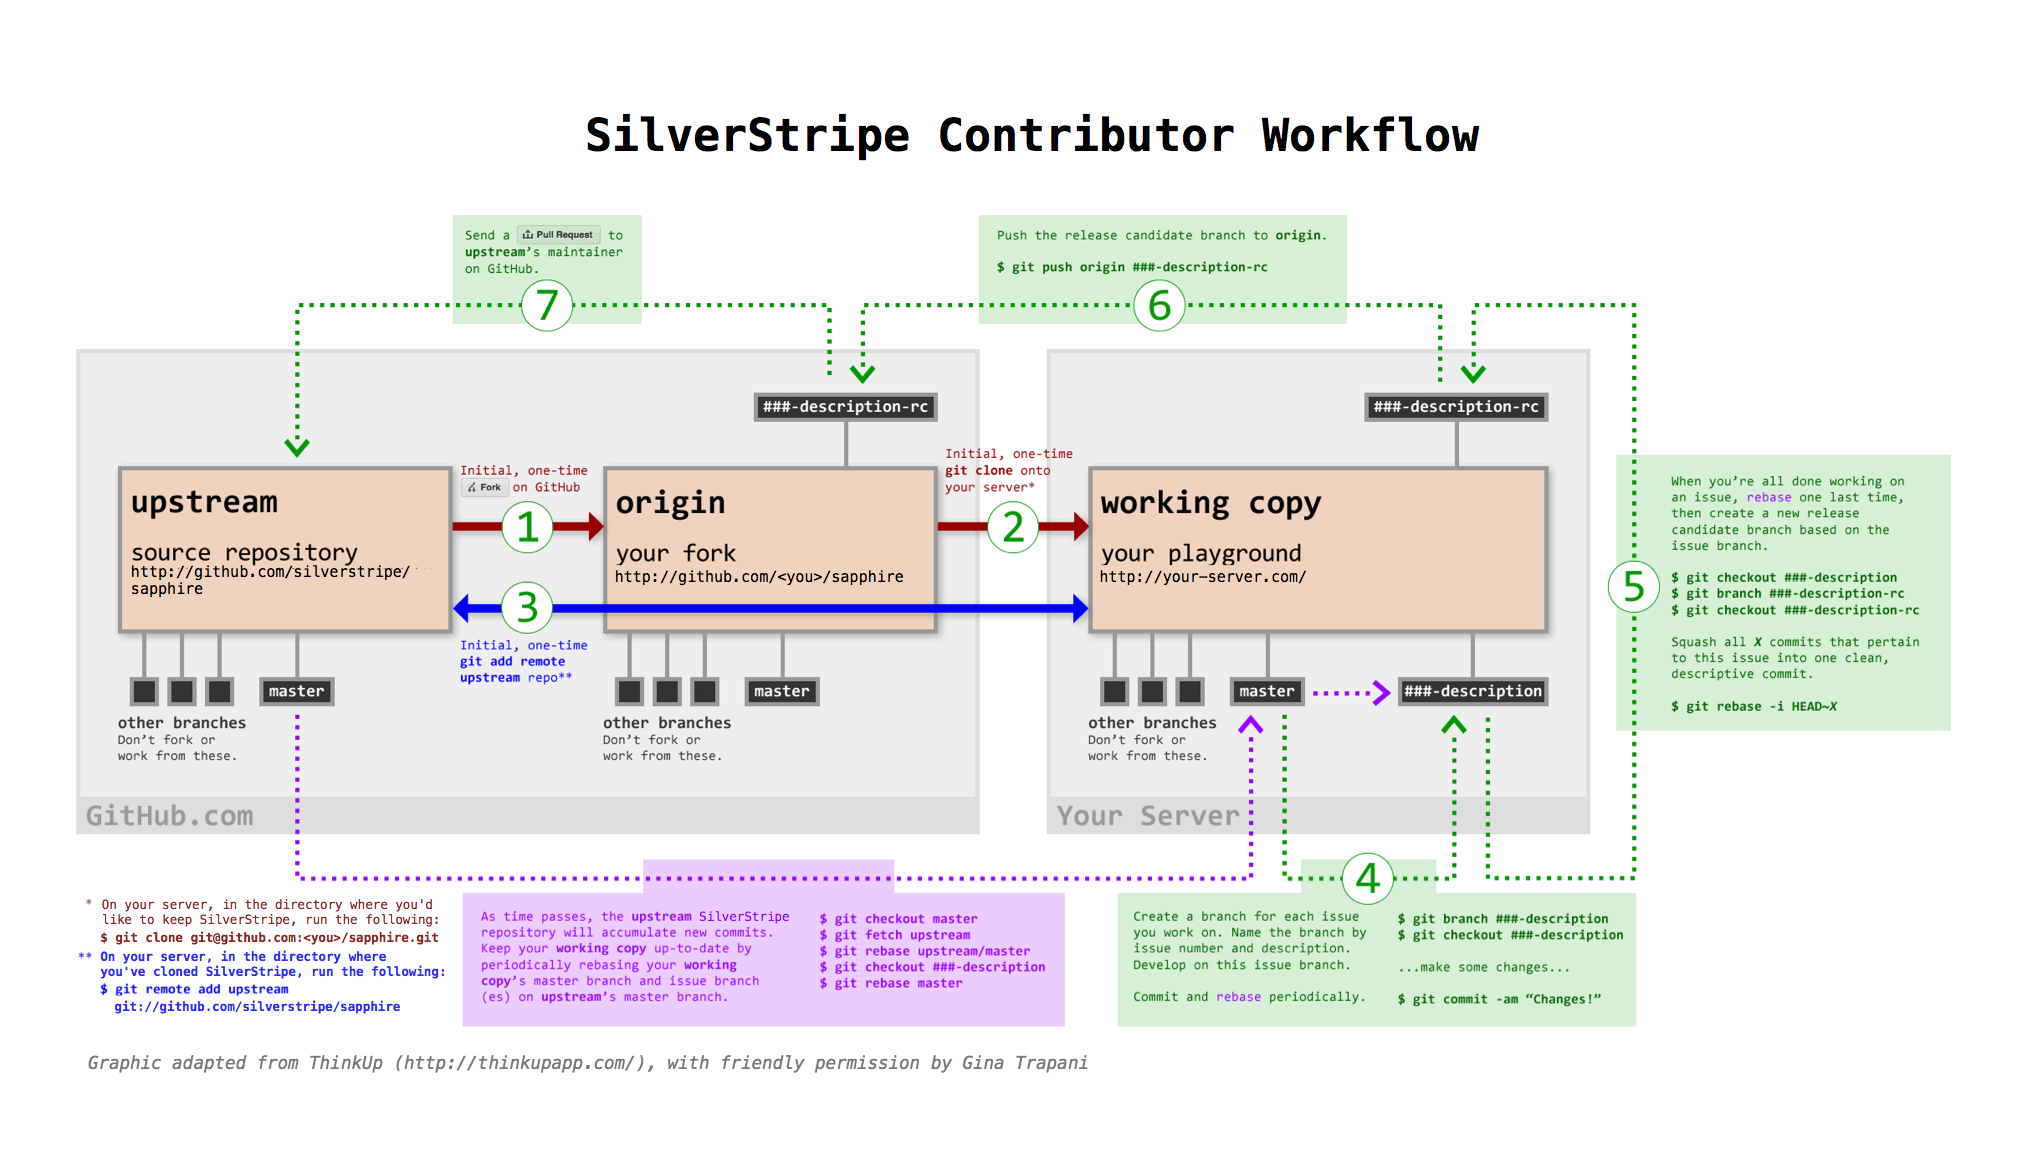
Workflow Diagram#
Quickfire Do's and Don't's#
If you aren't familiar with git and GitHub, try reading the "GitHub bootcamp documentation". We also found the free online git book and the git crash course useful. If you're familiar with it, here's the short version of what you need to know. Once you fork and download the code:
-
Don't develop on the master branch. Always create a development branch specific to "the issue" you're working on (on our GitHub repository's issues). Name it by issue number and description. For example, if you're working on Issue #100, a
DataObject::get_one()bugfix, your development branch should be called 100-dataobject-get-one. If you decide to work on another issue mid-stream, create a new branch for that issue--don't work on both in one branch. -
Do not merge the upstream master with your development branch; rebase your branch on top of the upstream master.
-
A single development branch should represent changes related to a single issue. If you decide to work on another issue, create another branch.
-
Squash your commits, so that each commit addresses a single issue. After you rebase your work on top of the upstream master, you can squash multiple commits into one. Say, for instance, you've got three commits in related to Issue #100. Squash all three into one with the message "Description of the issue here (fixes #100)" We won't accept pull requests for multiple commits related to a single issue; it's up to you to squash and clean your commit tree. (Remember, if you squash commits you've already pushed to GitHub, you won't be able to push that same branch again. Create a new local branch, squash, and push the new squashed branch.)
-
Choose the correct branch: see Picking the right version.
Editing files directly on GitHub.com#
If you see a typo or another small fix that needs to be made, and you don't have an installation set up for contributions, you can edit files directly in the github.com web interface. Every file view has an "edit this file" link.
After you have edited the file, GitHub will offer to create a pull request for you. This pull request will be reviewed along with other pull requests.
Check List#
- Adhere to our coding conventions
- If your patch is extensive, discuss it first on the silverstripe-dev google group (ideally before doing any serious coding)
- When working on existing tickets, provide status updates through ticket comments
- Check your patches against the "master" branch, as well as the latest release branch
- Write unit tests
- Write Behat integration tests for any interface changes
- Describe specifics on how to test the effects of the patch
- It's better to submit multiple patches with separate bits of functionality than a big patch containing lots of changes
- Only submit a pull request for work you expect to be ready to merge. Work in progress is best discussed in an issue, or on your own repository fork.
- Document your code inline through PHPDoc syntax. See our API documentation for good examples.
- Check and update documentation on docs.silverstripe.org. Check for any references to functionality deprecated or extended through your patch. Documentation changes should be included in the patch.
- When introducing something "noteworthy" (new feature, API change), update the release changelog for the next release this commit will be included in.
- If you get stuck, please post to the forum or for deeper core problems, to the core mailinglist
- When working with the CMS, please read the "CMS Architecture Guide" first
Commit Messages#
We try to maintain a consistent record of descriptive commit messages. Most importantly: Keep the first line short, and add more detail below. This ensures commits are easy to browse, and look nice on github.com (more info about proper git commit messages).
As we automatically generate changelogs from them, we need a way to categorize and filter. Please prefix noteworthy commit messages with one of the following tags:
NEWNew feature or major enhancement (both for users and developers)APIAddition of a new API, or modification/removal/deprecation of an existing API. Includes any change developers should be aware of when upgrading.BUGBugfix or minor enhancement on something developers or users are likely to encounter.
All other commits should not be tagged if they are so trivial that most developers can ignore them during upgrades or when reviewing changes to the codebase. For example, adding unit tests or documentation would not be considered "noteworthy". Same goes for version control plumbing like merges, file renames or reverts.
Further guidelines:
- Each commit should form a logical unit - if you fix two unrelated bugs, commit each one separately
- If you are fixing a issue from our bugtracker (cms and framework), please append
(fixes #<ticketnumber>) - When fixing issues across repos (e.g. a commit to
frameworkfixes an issue raised in thecmsbugtracker), use(fixes silverstripe/silverstripe-cms#<issue-number>)(details) - If your change is related to another commit, reference it with its abbreviated commit hash.
- Mention important changed classes and methods in the commit summary.
Example: Bad commit message
	finally fixed this dumb rendering bug that Joe talked about ... LOL
	also added another form field for password validation
	BUG Formatting through prepValueForDB()

	Added prepValueForDB() which is called on DBField->writeToManipulation()
	to ensure formatting of value before insertion to DB on a per-DBField type basis (fixes #1234).
	Added documentation for DBField->writeToManipulation() (related to a4bd42fd).
Branch for new issue and develop on issue branch#
Before you start working on a new feature or bugfix, create a new branch dedicated to that one change named by issue number and description. If you're working on Issue #100, a DataObject::get_one() bugfix, create a new branch with the issue number and description, like this:
$ git checkout -b 100-dataobject-get-one
	$ git add <filename>
	$ git commit -m 'Some kind of descriptive message (fixes #100)'
Then, you can push your new branch to GitHub, like this (replace 100-dataobject-get-one with your branch name):
$ git push origin 100-dataobject-get-one
Rebase Your Development Branch on the Latest Upstream#
To keep your development branch up to date, rebase your changes on top of the current state of the upstream master. See the What is git rebase? section below to learn more about rebasing.
If you've set up an upstream branch as detailed above, and a development branch called 100-dataobject-get-one, you can update upstream and rebase your branch from it like so:
	# make sure all your changes are committed as necessary in branch
	$ git fetch upstream
	$ git rebase upstream/master
	# make sure all your changes are committed as necessary in branch
	$ git fetch upstream
	$ git checkout master
	$ git rebase upstream/master
	$ git checkout 100-dataobject-get-one
	$ git rebase master
Conflicts are clearly marked in the code files. Make sure to take time in determining what version of the conflict you want to keep and what you want to discard.
	$ git add <filename>
	$ git rebase --continue
Once you have rebased your work on top of the latest state of the upstream master, you may have several commits related to the issue you were working on. Once everything is done, squash them into a single commit with a descriptive message (see "Contributing: Commit Messages").
To squash four commits into one, do the following:
$ git rebase -i upstream/master
Save and close the editor, and git will combine the "squash"'ed commits with the one before it.
Git will then give you the opportunity to change your commit message to something like, BUG DataObject::get_one() parameter order (fixes #100).
If you want to discard the commit messages from the commits you're squashing and just use the message from your "pick" commit(s) you can use "fixup" or "f" instead of "squash" to bypass the message editing and make the process a bit quicker.
Important: If you've already pushed commits to GitHub, and then squash them locally, you will have to force-push to your GitHub again. Add the -f argument to your git push command:
$ git push -f origin 100-dataobject-get-one
$ git commit --amend
Be careful not to commit any of your configuration files, logs, or throwaway test files to your GitHub repo. These files can contain information you wouldn't want publicly viewable and they will make it impossible to merge your contributions into the main development trunk.
Most of these special files are listed in the .gitignore file and won't be included in any commit, but you should carefully review the files you have modified and added before staging them and committing them to your repo. The git status command will display detailed information about any new files, modifications and staged.
$ git status
$ git commit -a
$ git commit -m 'Issue silverstripe/silverstripe-cms#100: Some kind of descriptive message'
What is git rebase?#
Using git rebase helps create clean commit trees and makes keeping your code up-to-date with the current state of the upstream master easy. Here's how it works.
Let's say you're working on Issue #212 a new plugin in your own branch and you start with something like this:
	      1---2---3 #212-my-new-plugin
	     /
	A---B #master
	      1---2---3 #212-my-new-plugin
	     /
	A---B--C--D--E--F #master
A cleaner way to do this is to use rebase to essentially rewrite your commits as if you had started at point F instead of point B. So just do:
git rebase master 212-my-new-plugin
git will rewrite your commits like this:
	                  1---2---3 #212-my-new-plugin
	                 /
	A---B--C--D--E--F #master
So when you're ready to send the new plugin upstream, you do one last rebase, test, and then merge (which is really no merge at all) and send out your pull request. Then in most cases, we have a simple fast-forward on our end (or at worst a very small rebase or merge) and over time that adds up to a simpler tree.
More info on the "Rebasing" chapter on git-scm.com and the git rebase man page.
License#
Portions of this guide have been adapted from the "Thinkup" developer guide, with friendly permission from Gina Trapani/thinkupapp.com.